

Ninety percent of the guys who sit in my chair asking for a slick back are frustrated with the same thing — they get it looking sharp when they leave the shop, then it collapses on the walk to the car. It’s almost never the haircut. It’s the product, the moisture level of the hair, and how they’re combing it back at home.
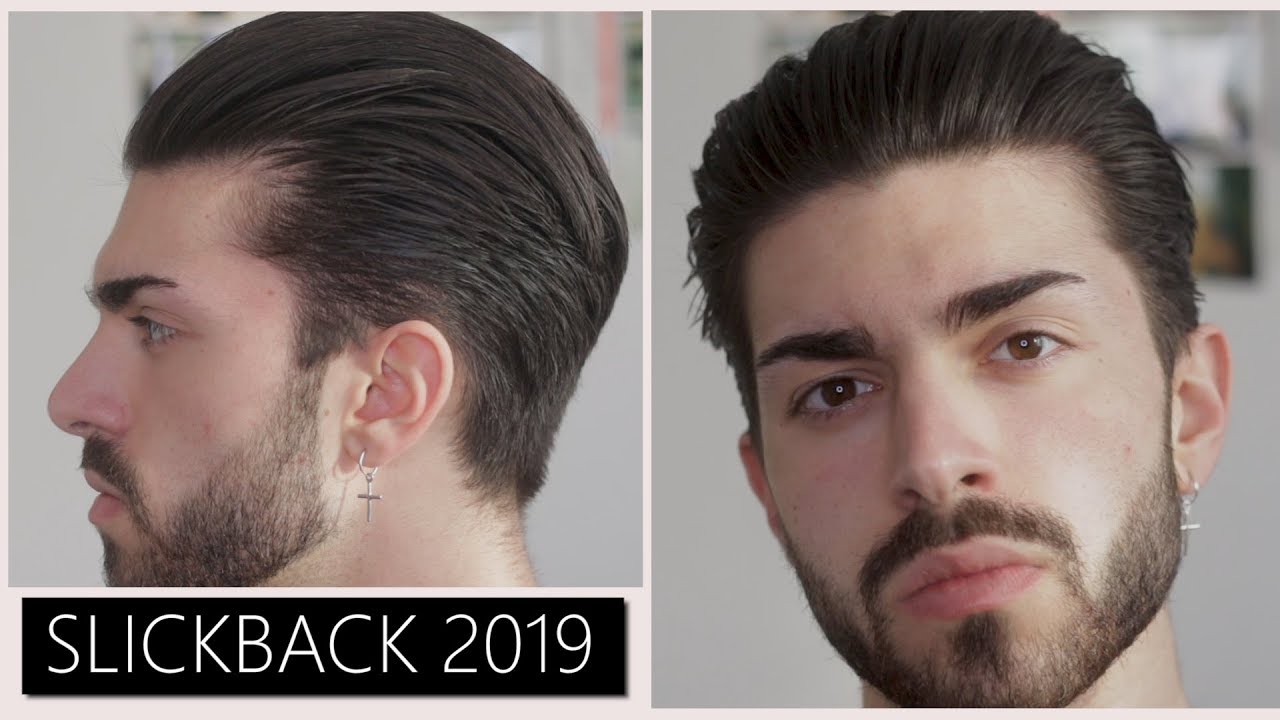
The good news is the modern slick back is far more forgiving than the wet-look version most tutorials still push. In 2026 the style has shifted toward a softer, matte, lived-in finish — pushed back with the fingers, not glued down with a comb — and paired with a burst fade or a low-taper on the sides. It looks intentional without looking like you’re on your way to a wedding.
This guide is the exact 3-phase method I use on clients in the shop, plus how to ask your barber for the right cut underneath, which products actually match your hair type, and how to fix the four problems that make a slick back fall flat by lunchtime.
Key Takeaways
- You need at least 4 inches on top to hold the shape — 5 to 6 inches gives you flexibility for the modern, softer version.
- The 2026 look is matte and finger-styled, not wet and comb-tracked — swap high-shine gel for a matte paste or clay-pomade hybrid.
- Apply product to damp hair (around 70% dry), never soaking wet — that’s the single biggest reason slick backs fall flat.
- Follow the 3-phase method: prep with a sea salt spray or pre-styler, build with a matte paste while blow-drying backwards, refine with your fingers or a wide-tooth comb.
- Pair the top with a burst fade, low-taper, or classic scissor-taper on the sides — ask your barber for a “slick back fade” and bring a reference photo.
Understanding the Slick Back Style
The slick back is nothing more than hair combed straight back from the forehead so it sits flat and controlled against the head. What’s changed in 2026 is the finish. The old-school version — think Gordon Gekko, hard part, glass-smooth top — is now the exception, not the rule. Most guys walking out of my shop with a slick back are wearing a matte, slightly textured version that reads clean but not corporate.
Two things drive the modern look: the product (matte paste or clay instead of high-shine pomade) and the finish technique (fingers and a light blow-dry instead of a fine-tooth comb dragged through soaking-wet hair). The result has movement, a bit of natural volume, and a lived-in feel that suits how most men actually dress in 2026 — jeans and a knit rather than a three-piece suit.
The style is also more versatile than people give it credit for. Pair it with a burst fade for a modern athletic vibe, a low taper for something office-appropriate, or leave the sides longer and combed back for the “old money” Italian look that’s been all over social media. The top is the same — the sides tell the story.
Hair Requirements

Before you touch any product, be honest about what your hair can and can’t do. The slick back is one of those styles that will fight you if the length, condition, or growth pattern isn’t ready — and no amount of pomade will paper over that. Get these two things right and the styling becomes almost automatic.
Hair Type
Straight and wavy hair take a slick back the easiest — the natural weight helps the hair sit back against the head and stay there. If you’re working with curly or coily hair, the slick back is still on the table, it just needs more prep: blow-drying the curl out while you comb backwards, then locking it in with a strong-hold clay or pomade. I recommend curly clients grow at least 5 to 6 inches on top so the curls have enough length to lay flat when stretched.
Thin or fine hair can absolutely do a slick back — you just need to build volume in first with a mousse or sea salt spray before blow-drying, and use a low-shine product so the scalp doesn’t show through. Guys with cowlicks or a strong natural growth pattern around the crown should expect a break-in period of 2 to 3 weeks of training the hair back every day before it holds on its own.
Current Condition
Length is the non-negotiable. You need a minimum of 4 inches on top for a proper slick back — 3 inches will hold for an hour and then fall out mid-afternoon. My sweet spot for most clients is 5 to 6 inches, which gives you enough length for the top to lay back cleanly plus enough flexibility to switch between a slick back, a side part, or a loose comb-back on days you want something less polished.
Condition matters as much as length. Freshly washed, product-free hair holds a slick back best — the cuticle is open, product grips, and the hair takes direction from the blow dryer. Day-three hair loaded with old product will slide out of place within an hour no matter how much fresh pomade you pile on. If you’re skipping wash day, at least rinse with hot water and towel-dry before styling.
Slick Back Styles by Hair Type
There’s no single “right” slick back — the version that suits you depends on your texture, your face shape, and how much daily effort you’re willing to put in. Here’s how I match the four main hair types to the version I’d recommend.
Straight Hair
Straight hair is the easiest but ironically the hardest to make look interesting — it’ll go flat and read severe if you use too much high-shine product. For 2026 I’d go matte paste or a clay-pomade hybrid, apply it to damp hair, and blow-dry with your fingers pushing everything back and slightly to one side. The little bit of asymmetry keeps it from looking helmet-flat. Pair with a low or mid taper on the sides.
Wavy Hair
Wavy hair is the ideal texture for the modern slick back — the natural bend adds movement without needing any styling tricks. Grow it out to at least 5 inches so the waves have enough weight to lay back. I like a medium-hold water-based pomade here; it enhances the wave pattern rather than crushing it. This is the texture the “Italian slick back” look was built for — see the full breakdown of wavy men’s hairstyles if you’re deciding between this and a looser comb-back.
Curly Hair
Curly hair takes a different approach — you’re stretching the curl before you slick it. Start with damp hair, apply a strong-hold clay or a heavier pomade, then blow-dry with a round brush pulling everything straight back. Expect it to be a 10-minute morning job rather than a 2-minute one, and expect the finish to have texture rather than being glass-smooth. That textured look is the current trend anyway. If you want a shortcut, browse curly styles that don’t need daily blow-drying to compare.
Thick vs. Fine Hair
Thick hair holds a slick back beautifully but needs more product — a nickel-size for the top rather than a dime-size — and a stronger-hold pomade to keep it flat. The trade-off is you can go a full day without needing to touch it up. Fine hair is the opposite: a pea-sized amount is plenty, use a matte product to avoid seeing scalp, and expect to comb once or twice through the day. If you’re on the fine side of things, add a volumizing mousse before the pomade to give the top some lift before it lays back.
Essential Tools and Products

You don’t need a full grooming shelf for this — five items get the job done. I’ve listed them in the order you’ll use them so you can build up your kit without buying anything you won’t touch.
Fine-mist water spray bottle. Cheap, boring, essential. You need your hair damp — not wet — and the easiest way to get it there is to towel-dry until it’s almost dry, then mist it back up to 70% moisture. This is more consistent than trying to time it fresh out of the shower.
Sea salt spray or a lightweight pre-styler. The single biggest change in modern slick back styling. A few sprays before the pomade adds grip and slight texture so the finished look isn’t slick-and-slippery, it’s slick-and-controlled. This is the layer that makes a 2026 slick back look intentional instead of dated.
A medium-to-strong hold matte paste or clay-pomade hybrid. Skip old-school greasy pomades unless you’re specifically going for the wet look. My go-to recommendations are matte pastes for fine to medium hair and clay-pomades for thick hair. Water-based means you can restyle and it rinses out in one wash — oil-based means shine but a two-shampoo cleanup.
A blow dryer with a concentrator nozzle. This is non-negotiable if you want your slick back to hold past lunch. Air-drying the hair backwards is what actually locks the direction into the hair shaft — the product just holds it there. Medium heat, 3 to 4 minutes, always aiming from front to back.
A fine-tooth comb or a boar-bristle brush. Comb for that classic groomed finish with visible tracks; brush for the softer, less-defined modern look. Most of my clients now use a brush and their fingers instead of a comb — that’s where the trend has moved.
The Complete Slick Back Process

This is the exact three-phase method I walk clients through when they book a “learn to style at home” session. Once you’ve done it four or five times it takes about 5 minutes end-to-end. The first few tries will take longer — that’s normal, and it’s better to go slow while you’re building the muscle memory.
Phase 1: Preparation
Start with clean hair — clarifying shampoo if you’re stripping out old buildup, regular shampoo if you’re on a normal wash cycle. Towel dry until your hair is damp but not dripping. The rule of thumb is 70% dry: if you shake your head and nothing flies off, you’re there. If you overshoot and it goes bone-dry, mist it back with your spray bottle.
Now comes the step most tutorials skip — spritz 3 to 5 pumps of sea salt spray or a pre-styler through the top and work it in with your fingers. This gives you the grip layer. Skip it and your slick back will slide out of shape within the hour. This one addition is what fixes about half the “my slick back never holds” complaints I hear in the shop.
Phase 2: Creating the Slick Back
Warm a pea-sized amount of matte paste — nickel-size if your hair is thick — between your palms until it’s clear and pliable. Cold product balls up and creates those lumps you see on the top of the head. Apply from the crown forward, then work your way back, distributing it evenly. Cover the sides too if they’re long enough to slick back.
Now the blow dryer does the real work. Aim from the front hairline, pointing back and slightly down at the ears. Keep the nozzle 4 to 6 inches from your head, on medium heat. Use your free hand — fingers spread — to guide the hair backwards as you dry. Two to three minutes is usually enough. This is the step that actually trains the hair to sit back, not the product.
Phase 3: Refinement
Switch off the dryer and take your comb or brush. For the modern textured look, use a boar-bristle brush and pull straight back once from the front to the crown; for the sharper classic look, use a fine-tooth comb and make defined passes with visible tracks. Either way, only comb once or twice — over-combing dries the product out and kills the hold.
Finish with a 5-second blast of cold air. This seals the cuticle, locks the shape, and — this is the part most people miss — is the single easiest way to make a home slick back look like it came from the barbershop. If you have flyaways at the crown, hit them with a light finishing spray or a drop of hair oil rubbed between your palms and pressed flat.
Daily Styling Routine

Your morning routine should sit at 5 to 8 minutes once the three-phase method is second nature. Here’s the compressed daily version I give clients to keep on their bathroom mirror.
Wash days: Full three-phase process — shampoo, towel dry to 70%, sea salt spray, matte paste, blow-dry backwards, refine with brush or comb, cold blast. Aim for 3 to 4 wash days per week if you can. Over-washing strips the natural oils that keep the hair pliable and healthy for this style.
Between wash days: Mist the top with your water spray bottle until damp — this reactivates yesterday’s product. Add a pea-sized amount of fresh paste only if you need extra hold. Comb back, dryer for 60 seconds, cold blast, done. This should take 2 to 3 minutes.
Midday touch-ups: Carry a small pocket comb. If the top starts to lift by mid-afternoon, dampen your palms in a bathroom sink, run them front-to-back over your hair, then comb backwards once. The residual product reactivates. Do not add more product mid-day — that’s how you end up with a greasy build-up by 6pm.
Night routine: Wearing a silk or satin durag or beanie to bed for the first 2 to 3 weeks trains the hair to sit back naturally. After a month most clients don’t need it. Read the full walkthrough on maintaining healthy hair and beard if you want the wider grooming context.
Troubleshooting Common Issues

Even guys who nail the three-phase method run into the same four problems. Here’s how to diagnose and fix each one in under a minute.
Problem 1 — The top falls flat within an hour. This is a product-to-hair-type mismatch nine times out of ten. Fine hair with a heavy pomade will collapse under its own weight. Switch to a lightweight matte paste and use less of it. If you’re already using a light product, the fix is the sea salt spray — you’re missing the grip layer.
Problem 2 — Visible flakes or a dry, chalky finish. That’s gel drying out, or a water-based pomade that’s evaporated. Fix: swap to a longer-wearing matte paste, or mist the top lightly with water to reactivate. Never apply fresh product on top of dried-out old product — it will pill and flake worse.
Problem 3 — The hair on the sides won’t lay back. If your barber has kept the sides long enough to slick, the culprit is usually a cowlick or a strong growth pattern at the temples. Blow-dry from the temple outward toward the back of the head — cross-directional heat retrains the growth pattern. Two weeks of doing this daily makes it hold on its own.
Problem 4 — A greasy, wet, “just-showered” look. Too much product, an oil-based pomade, or the hair was too wet when you applied it. All three are common on the first few attempts. Fix: pea-size amounts only, water-based products, and 70% dry hair — not soaking. A blast of cold air at the end also visibly matifies the finish.
⚠️ Common Mistake
Applying product to soaking-wet hair. Water dilutes the pomade’s grip, spreads it unevenly, and creates that greasy sheen that reads dated. Towel dry until the hair is damp — not wet — and mist back up if you overshoot. This one adjustment fixes more failed slick backs than any product upgrade ever will.
Ready to Find Your Perfect Cut?
You’ve read about the styles. Now find the one that fits YOUR face shape, hair type, and lifestyle.
How to Slick Back Hair Without Gel
Gel dries stiff, flakes by midday, and makes restyling impossible. It also creates that shiny, dated finish that the modern slick back has moved away from. Here are the three alternatives I recommend to clients in the shop, in order of how often I reach for them.
Pomade Method
Water-based pomade is my default for clients who want a bit of shine and easy restyling through the day. Medium hold, matte to satin finish, adds a drop of water and a re-comb and you’re back in shape. Skip oil-based petroleum pomades unless you’re going for the vintage pompadour or greaser look — those cost you a two-shampoo cleanup every night. Full walkthrough in the how to use pomade guide.
Hair Clay or Paste
My current top recommendation for 2026. Matte finish, medium-to-strong hold, gives the hair a natural, lived-in look that reads modern instead of retro. Clay works especially well on thick or oily hair — it absorbs some of the excess oil while it holds. Slightly less flexible to restyle than water-based pomade, but the finish is where the trend is headed and it holds all day without touch-ups.
Blow-Dry Only Method
Yes, you can slick back hair with no product at all — but it takes patience. After showering, comb everything straight back while blow-drying on medium heat for 3 to 4 minutes. Do this every day for 2 to 3 weeks and the hair starts holding the shape on its own. Works best on straight to wavy hair with at least 4 inches of length. Guys who train their hair this way can go product-free most days and only reach for paste on nights out.
FAQs
Can thin hair work for a slick back style?
Yes. Thin hair actually takes a slick back cleanly as long as you build in volume first with a mousse or sea salt spray before the pomade, then finish with a matte product so the scalp doesn’t show through. Keep the sides shorter — a low taper or burst fade — to create the illusion of more density on top. If thinning is more advanced, look at the wider men’s haircuts for thin hair guide for cuts that make thin hair look thicker.
How much product should I use for slick back hair?
Pea-sized for fine or medium hair, dime-sized for medium-to-thick, nickel-sized for thick or long hair. It’s always safer to start small and add a second dab if you need more coverage — you can’t take excess product back out without rewashing. Overloading is the fastest way to end up with a greasy, weighed-down finish that falls apart by mid-afternoon.
What’s the difference between pomade and gel for this style?
Pomade — especially water-based — gives you flexibility to restyle through the day, doesn’t flake, and washes out cleanly. Gel gives strong initial hold but dries stiff, cracks when you touch it, and can’t be adjusted once it sets. For a modern 2026 slick back I’d skip gel entirely and reach for a matte paste or a clay-pomade hybrid — you get the hold without the crunch and the finish looks lived-in rather than lacquered.
How do you train your hair to slick back?
Consistency is the whole game. After every shower, comb your damp hair straight back and blow-dry it in that direction for 3 to 4 minutes on medium heat. Wearing a silk durag or a beanie around the house reinforces the pattern between styling sessions. Most guys see the hair start naturally falling backward within 2 to 3 weeks — the growth pattern actually starts to shift and you’ll spend less time fighting it every morning.
How do you keep a slick back in place all day?
Layer your grip. Sea salt spray or pre-styler on damp hair for the first grip layer, medium-to-strong hold matte paste for the second, blow-drying backwards to lock the direction into the hair shaft. Finish with a cold-air blast to seal the cuticle. Carry a small pocket comb — a quick re-comb with slightly damp hands mid-afternoon reactivates the product without needing to add more.
Can you slick back curly hair?
Yes, but it’s a different process. You’re blow-drying the curl out while combing backwards to stretch the hair, then applying a strong-hold clay or heavier pomade to hold it flat against the head. The finish won’t be glass-smooth like straight hair — you’ll get a textured, defined look — but that’s exactly the direction the trend has moved anyway. Start with at least 5 inches of length on top so the curls have enough weight to lay back once stretched. See the fuller breakdown in how to get curly hair for men if you’re growing it out from short.
Was this article helpful?

Khamis Maiouf is a professional barber who graduated from Hinckley College in England with a Level 3 qualification in hairdressing. With over 20 years of experience, he is an award-winning barber who has mentored numerous students and styled thousands of clients. A recognised expert featured on StyleCraze (20M+ readers).
Credentials: Level 3 Hairdressing (Hinckley College, UK) • 20+ Years Professional Experience • Featured Expert on StyleCraze • Founder of Book of Barbering